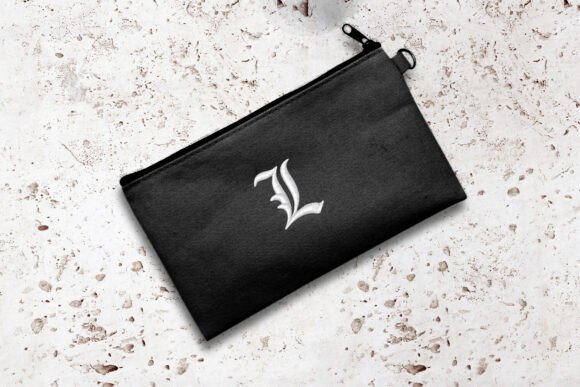
Blackletter L Mini Embroidery: A Craft Fair Review
First Impressions: Bold Tradition Meets Modern Utility
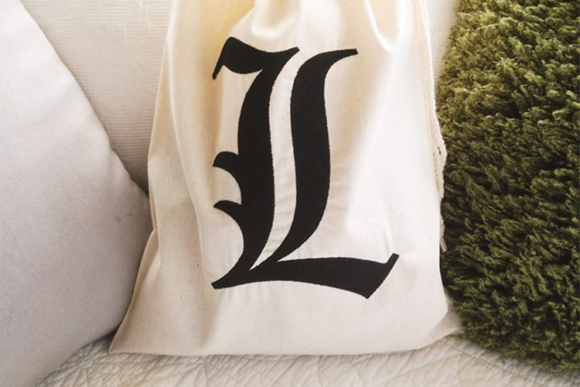
As an embroidery designer preparing for a weekend craft fair, my first priority is assessing whether a design will actually sell when displayed on a crowded table. When reviewing the Blackletter L Mini Embroidery, the immediate impression is one of structured elegance mixed with rustic utility. Blackletter, often associated with Old English or Gothic typography, carries a weight and history that standard block letters simply cannot achieve. This specific machine embroidery design feels premium and intentional rather than generic.
For a handmade product lineup, this aesthetic bridges two popular markets: the dark academia crowd and the modern farmhouse enthusiast. It does not feel overly festive or seasonal, which is a massive advantage for year-round sales. The bold strokes suggest durability, making it psychologically appropriate for functional items like tote bags and aprons. However, because it is a single letter "L" without accompanying alphabet sets, it positions itself as a monogram or initial-specific product rather than a customizable name service. This distinction is crucial for booth workflow; you are selling a finished aesthetic, not taking custom orders on the spot.
Strategic Product Placement for Market Booths
Determining where to place the Blackletter L Mini Embroidery in your production queue requires understanding how the style interacts with different substrates. Based on the included sizes ranging from 1 inch to 2.5 inches, this design excels as both a subtle accent and a clear focal point depending on the application.
- Tote Bag Design: At the 2-inch or 2.5-inch size, this letter commands attention on canvas market bags. The thick lines of the blackletter style hold up beautifully against the coarse weave of natural cotton canvas. Place it centered on the lower third of the bag for a minimalist, high-end boutique look.
- Apron Embroidery: For craft fair sellers focusing on kitchenware, this design works exceptionally well on denim or heavy linen aprons. Position the 2-inch version over the heart area or centered on the chest bib. The historical weight of the font complements the utilitarian nature of aprons, suggesting heritage craftsmanship.
- Tea Towel Embroidery: Use the 1.5-inch or 2-inch size here. Flour sack towels provide a smooth surface that captures the intricate corners of the blackletter serifs. This is a strong seller for housewarming gifts, especially when paired with neutral thread colors like charcoal, navy, or deep forest green.
- Embroidered Patch: The 1-inch and 1.5-inch sizes are ideal for creating standalone patches. Because blackletter can be dense, these smaller versions work best on felt or twill backing. These serve as excellent low-cost add-ons at your booth or as branding elements for your own packaging.
- Fabric Pouches and Zipper Bags: Small cosmetic pouches benefit from the 1.5-inch size placed near the zipper pull. It adds a personalized touch without overwhelming the limited surface area of a small shop product.
Production Realities and Stitch Performance
From a technical production standpoint, the Blackletter L Mini Embroidery presents specific considerations for batch manufacturing. Blackletter fonts are characterized by varying stroke widths and sharp angles. In digital embroidery file formats like DST, PES, JEF, and VP3, these shapes require precise digitizing to maintain clarity.
The inclusion of five distinct sizes (1", 1.5", 2", 2.5") is a significant asset for commercial embroidery workflows. However, users must understand that resizing blackletter is not always linear. The 1-inch version will naturally have higher stitch density relative to its size compared to the 2.5-inch version. When producing for a craft fair, I recommend sticking strictly to the provided sizes within the zip file. Resizing beyond these parameters risks distorting the serif details or causing thread breaks due to excessive density in small areas.
For Etsy sellers and digital sellers offering finished goods, this design photographs remarkably well. The high contrast between the bold letterform and negative space creates visual interest in thumbnails. Unlike script fonts that can blur in photos, the architectural structure of this L remains legible even in small printable mockup images. This clarity translates directly to buyer engagement online and helps customers recognize the quality of your work from a distance at a physical market.
Critical Use Notes for Quality Control
While versatile, this machine embroidery design demands respect during production to avoid wasted materials and time. As you prepare your inventory, keep these practical warnings in mind:
- Density on Textured Fabrics: Blackletter relies on clean edges. On highly textured terry cloth or waffle-weave tea towels, the fine serifs may get lost. Always use a water-soluble topping to flatten the fabric texture and ensure the stitches sit on top of the pile.
- Small Size Clarity: At the 1-inch size, verify that your machine’s needle and thread weight are appropriate. Using a thicker 40-weight thread on a 1-inch blackletter design may cause fill stitch overlap and puckering. Consider switching to a finer thread or testing the smallest size only on tightly woven fabrics.
- Curved Surfaces: If applying this to caps, be aware that the rigid vertical lines of blackletter can appear distorted on a curved brim. Hoop alignment must be perfect. Test on a scrap cap first to ensure the letter sits flat and doesn't torque during stitching.
- Thread Contrast: This design loses its impact if there is insufficient contrast. Avoid tone-on-tone stitching unless you are aiming for a subtle, textural effect. For maximum sales appeal at a booth, use classic high-contrast pairings like black on cream or white on navy.
- Stabilizer Selection: Due to the potential density of the fill stitches in the wider parts of the letter, do not skimp on stabilizer. A medium-weight cutaway is generally safer than tear-away for wearable items like aprons to prevent distortion after washing.
Designer Checklist Before Selling Finished Products
Before listing this as a craft fair product or adding it to your Etsy shop, run through this professional verification process. While the zip file includes eight formats (DST, EXP, HUS, JEF, PEC, PES, VP3, XXX), compatibility varies by machine brand and age.
- Test Sew-Out: Never skip this step. Stitch out every size you intend to sell on the exact fabric you plan to use. Inspect the registration of the outline versus the fill.
- Hoop Size Confirmation: Ensure your hoop accommodates the 2.5-inch design plus adequate margin for stabilization. Even though the design is mini, proper hooping tension is vital for crisp corners.
- Commercial Licensing: Verify the specific license terms included with your purchase. Confirm that you have the right to sell physical embroidered products versus just the digital embroidery file itself.
- Create Real Mockups: Photograph your actual test sew-outs rather than relying solely on software renderings. Customers trust real photos of stitch texture over digital simulations.
- Batch Consistency: If producing multiple tote bags or aprons, mark your placement consistently. The geometric nature of blackletter makes uneven placement immediately obvious to the buyer's eye.
The Blackletter L Mini Embroidery is a powerful tool for makers who value typographic tradition. By respecting its technical requirements and leveraging its bold aesthetic on appropriate substrates, you can create a cohesive, high-value collection that stands out in the competitive handmade marketplace. Whether used as a signature mark on your own brand assets or as a featured monogram on giftable goods, this design offers the reliability and style necessary for successful commercial embroidery ventures.